下面从源码简单分析一下vuex的启动与使用过程,适合对vuex有使用经验看一下;适当回顾,也是对提高很有帮助。
先看一下简略初始化的流程,后面看完再回头过一遍:
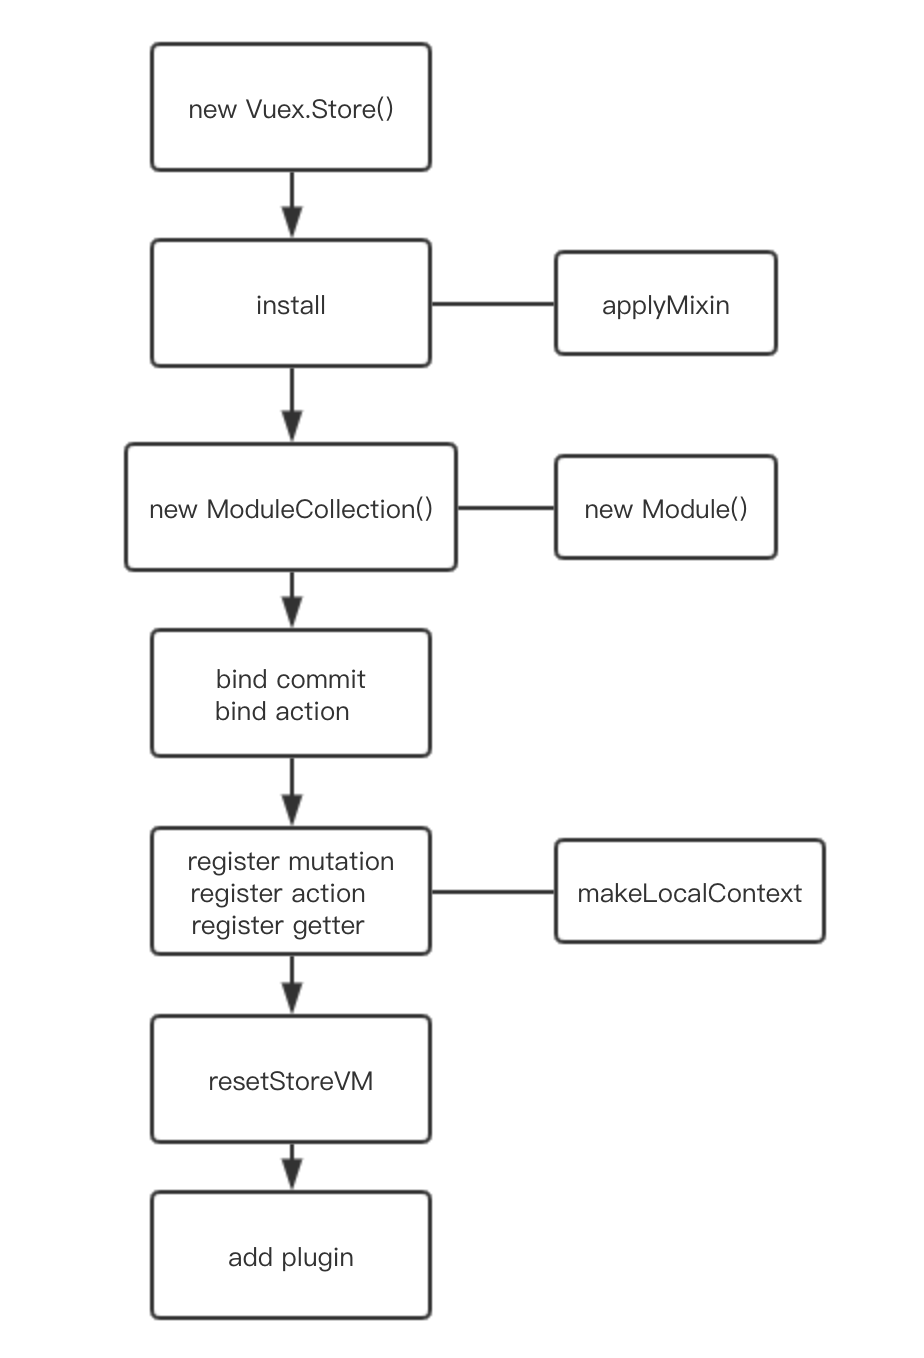
图中左边是主要的流程,右边是对某个流程的重要关联,也属于主流程
在src目录下的index.js文件主要内容是:
1 2 3 4 5 6 7 8 9 10 |
export default {
  Store,
  install,
  version: '__VERSION__',
  mapState,
  mapMutations,
  mapGetters,
  mapActions,
  createNamespacedHelpers
} |
其中mapXxx这些是工具函数,暂不展开说明;vuex的主要内容是在Store中,就从这个文件为入口进行分析:
安装挂载store
1 2 3 4 5 6 7 8 9 10 11 12 13 14 15 16 |
// store.js
export class Store {
    constructor () {
        if (!Vue && typeof window !== 'undefined' && window.Vue) {
          install(window.Vue)
        }

        if (process.env.NODE_ENV !== 'production') {
          assert(Vue, `must call Vue.use(Vuex) before creating a store instance.`)
          assert(typeof Promise !== 'undefined', `vuex requires a Promise polyfill in this browser.`)
          assert(this instanceof Store, `store must be called with the new operator.`)
        }

        // ...
    }
} |
当调用new Store()的时候;先看第二个if,这里通过判断当前运行的环境,例如在开发环境中,不是通过new,不支持Promise等情况进行warning提示
在构造器的第一个if当中,帮助用户自动安装vuex到vue中,安装的主要函数是install,我们继续来看这个函数:
1 2 3 4 5 6 7 8 9 10 11 12 |
function install (_Vue) {
  if (Vue && _Vue === Vue) {
    if (process.env.NODE_ENV !== 'production') {
      console.error(
        '[vuex] already installed. Vue.use(Vuex) should be called only once.'
      )
    }
    return
  }
  Vue = _Vue
  applyMixin(Vue)
} |
在install函数当中,在非生产环境当中,也会判断是否有重复安装;若没有重复安装,则调用applyMixin方法。
1 2 3 4 5 6 7 8 9 10 11 12 13 14 15 16 17 18 19 20 21 22 23 24 25 26 27 28 29 30 31 32 |
// applyMixin function
export default function (Vue) {
  const version = Number(Vue.version.split('.')[0])

  if (version >= 2) {
    Vue.mixin({ beforeCreate: vuexInit })
  } else {
    const _init = Vue.prototype._init
    Vue.prototype._init = function (options = {}) {
      options.init = options.init
        ? [vuexInit].concat(options.init)
        : vuexInit
      _init.call(this, options)
    }
  }

  /**
   * Vuex init hook, injected into each instances init hooks list.
   */

  function vuexInit () {
    const options = this.$options
    // store injection
    if (options.store) {
      this.$store = typeof options.store === 'function'
        ? options.store()
        : options.store
    } else if (options.parent && options.parent.$store) {
      this.$store = options.parent.$store
    }
  }
} |
对于applyMixin的处理分两种情况,如果是大于`vue@2.x版本,会使用全局混入的方法处理,把初始化的过程加入到组件的beforeCreate钩子;而对于vue@1.x版本,会在原型链中添加_init方法;这两种情况都是调用了vuexInit`的函数;
vuexInit的函数的处理是把store挂载到每个组件的this.$store中;大概的逻辑是,每个组件调用的时候,都会从父组件(this.$options.parent)获取$store,那样子就可以做到把$store逐级往下传递:
1 2 3 4 |
root
|-- foo
    |-- bar
|-- baz |
组件渲染也是从上层往下层渲染,例如上面的结构,根组件是通过this.$options.store获取$store; foo组件的父组件是root,那么从root中获取$store的引用;而渲染到bar,baz的时候,就从foo组件中获取。
安装过程小结:在调用new Store()的时候,会判断当前环境支持情况,是否重复安装等情况进行判断,若不符合要求会报warning或error;安装的时候注入全局mixin或者更改Vue.prototype方法,对新增组件完成添加$store的过程。
根据配置生成模块
通过上一步安装Store之后,之后就根据用户传入的配置进行初始化。下面的代码片段仍然属于Store的构造器
1 2 3 4 5 6 7 8 9 10 11 12 13 14 15 |
class Store {
  constructor () {
    // 安装Store...
    this._committing = false
    this._actions = Object.create(null)
    this._actionSubscribers = []
    this._mutations = Object.create(null)
    this._wrappedGetters = Object.create(null)
    // 生成模块
    this._modules = new ModuleCollection(options)
    this._modulesNamespaceMap = Object.create(null)
    this._subscribers = []
    this._watcherVM = new Vue()
  }
} |
这一段的代码片段没什么特别,把一些属性挂载到this,也就是Store实例;其中有一段this._modules = new ModuleCollection(options)需要调用到外部class生成:
1 2 3 4 5 6 7 8 9 10 11 12 13 14 15 16 17 18 19 20 21 22 23 24 25 26 27 28 29 |
// module-collection.js
export default class ModuleCollection {
  constructor (rawRootModule) {
    // rawRootModule 为用户传入的配置,{ state, mutations, modules } 等
    this.register([], rawRootModule, false)
  }
  register (path, rawModule, runtime = true) {
    // balabala
    if (process.env.NODE_ENV !== 'production') {
      assertRawModule(path, rawModule)
    }

    const newModule = new Module(rawModule, runtime)
    if (path.length === 0) {
      this.root = newModule
    } else {
      // 绑定到对应的父模块
      const parent = this.get(path.slice(0, -1))
      parent.addChild(path[path.length - 1], newModule)
    }

    // register nested modules
    if (rawModule.modules) {
      forEachValue(rawModule.modules, (rawChildModule, key) => {
        this.register(path.concat(key), rawChildModule, runtime)
      })
    }
  }
} |
构造器中没什么特别,调用register方法,而传过去的方法是三个:
path = []模块的路径,根目录为空值 [],非根目录则为模块嵌套的路径:['foo', 'bar']rawModule = rawRootModulerawRootModule 为该模块的配置,根目录的配置为用户传入的所有配置runtime = false
忽略掉环境的判断,可以看到还需要调用新模块方法:new Module();这一块我们暂时忽略,知道是根据当前的配置生成一个模块,后面回头再看;
由于初始化的path数组为空,因此只需要在ModuleCollection的实例的root属性添加新模块引用;执行到if (rawModule.modules),若根模块有modules,则表示有子模块,就会遍历所有的子模块,同样调用register;当子模块调用的时候,需要把子模块,挂载到父模块中。例如:
1 2 3 4 5 6 7 8 9 10 11 12 13 14 15 16 17 |
new Vuex.Store({
  state: {},
  mutations,
  modules: {
    foo: {
      state: {},
      modules: {
        bar: {
          state: {}
        }
      }
    },
    baz: {
      state: {}
    }
  }
}) |
对于这个配置,根目录下有foo与baz模块,foo模块有bar模块;对于这种结构生成的ModuleCollection实例简略信息为:
1 2 3 4 5 6 7 8 9 10 11 12 13 14 15 16 |
{
  root: {
    state: {},
    _children: {
      foo: {
        state: {},
        _children: {
          bar: {}
        }
      },
      baz: {
        state: {}
      }
    }
  }
} |
至此,ModuleCollection已完成;我们回头看一下刚才new Module()的处理:
1 2 3 4 5 6 7 8 9 10 |
class Module {
  constructor (rawModule, runtime) {
    this.runtime = runtime
    this._children = Object.create(null)
    this._rawModule = rawModule
    const rawState = rawModule.state

    this.state = (typeof rawState === 'function' ? rawState() : rawState) || {}
  }
} |
只是把构造函数的参数挂载到实例,其中_rawModule是指该模块对应的配置,mutations,state这些。
小结:通过new ModuleCollection()传入用户的配置,调用register递归把子模块注册完毕,形成模块间的父子关系,最后挂载到store._modules属性中
绑定commit与dispatch方法
对配置的模块关系处理完毕之后,就需要给store绑定commit与dispatch
1 2 3 4 5 6 7 8 9 10 11 12 13 |
class Store {
  constructor () {
    // ...
    const store = this
    const { dispatch, commit } = this
    this.dispatch = function boundDispatch (type, payload) {
      return dispatch.call(store, type, payload)
    }
    this.commit = function boundCommit (type, payload, options) {
      return commit.call(store, type, payload, options)
    }
  }
} |
这里先提取原型链的commit和dispatch方法,然后重新赋值,使用call方法保证了commit与dispatch方法执行的上下文为store的实例
根据模块关系注册muations、actions、getters
1 2 3 4 5 6 7 8 9 10 11 12 13 14 15 16 17 18 19 20 21 22 23 24 25 26 27 28 29 30 31 32 33 34 35 36 37 38 39 40 41 42 43 44 45 46 47 48 49 50 51 52 53 54 55 56 57 58 59 60 61 62 63 64 65 66 67 68 69 |
// store.js
class Store {
  constructor () {
    // ..
    const state = this._modules.root.state

    // 递归把所有模块的mutations等注册
    installModule(this, state, [], this._modules.root)
  }
}

// installModule
function installModule (store, rootState, path, module, hot) {
  const isRoot = !path.length
  // 获取模块的路径,例如;['foo', 'bar'] => 生成 /foo/bar
  const namespace = store._modules.getNamespace(path)

  // register in namespace map
  if (module.namespaced) {
    if (store._modulesNamespaceMap[namespace] && process.env.NODE_ENV !== 'production') {
      console.error(`[vuex] duplicate namespace ${namespace} for the namespaced module ${path.join('/')}`)
    }
    store._modulesNamespaceMap[namespace] = module
  }

  // set state
  if (!isRoot && !hot) {
    const parentState = getNestedState(rootState, path.slice(0, -1))
    const moduleName = path[path.length - 1]
    store._withCommit(() => {
      Vue.set(parentState, moduleName, module.state)
    })
  }

  const local = module.context = makeLocalContext(store, namespace, path)

  // 注册mutation
  // 添加一个_mutation属性到store
  // 把同名的mutation放到同一个数组
  // store._mutations = [
  //   handler1,
  //   handler2
  // ]
  module.forEachMutation((mutation, key) => {
    const namespacedType = namespace + key
    registerMutation(store, namespacedType, mutation, local)
  })

  // 注册 action
  // 添加一个 _action属性到store,与 mutation 类似
  module.forEachAction((action, key) => {
    const type = action.root ? key : namespace + key
    const handler = action.handler || action
    registerAction(store, type, handler, local)
  })

  // 注册 getters
  // 添加一个 _wrappedGetters 属性到 store,与mutation和action有点不同
  // 只能有一个getters
  module.forEachGetter((getter, key) => {
    const namespacedType = namespace + key
    registerGetter(store, namespacedType, getter, local)
  })

  // 递归安装模块
  module.forEachChild((child, key) => {
    installModule(store, rootState, path.concat(key), child, hot)
  })
} |
来分析一下installModule,部分有写注释到代码;if (module.namespaced)是用来判断是否有重名的模块,在非生产环境提示(真的很多提示...),然后来到关键一步:
1
|
const local = module.context = makeLocalContext(store, namespace, path) |
通过makeLocalContext函数,对当前模块对应的commit与dispatch再做一层处理,使得适配对子模块路径调用,例如commit('/foo/bar');对模块的state与getters做数据劫持处理;这个暂时先跳过,我们先知道这个函数的作用。
接下来installModule就对mutations,actions,getters进行注册,分别赋值到:
mutations=>store._mutationsactions=>store._actionsgetters=>store._wrappedGetters
那么store._actions里面是什么?这是一个hash数据,key是action的名称,value是这个action的handler调用函数。
为什么一个action对应多个handler?因为vuex对module处理的时候,如果模块没有明确声明namespaced: true,那么这个handler获取到的state也是'root'下的数据
这些handler有什么特别?为了传入更多的参数,例如我们调用的时候是:store.dispatch('type'),但在store的action,可以接收更多的参数;因为注册actions的时候,再套一层函数,设置handler在调用传入参数。
1 2 3 4 5 |
store: {
  actions: {
    type ({ commit, rootState }) {}
  }
} |
mutations与actions比较相似,允许多个同名,但是getters只能允许有一个。
当注册完以上数据的时候,则对所有子模块递归处理,那么子模块的actions等也处理完毕;最后得到所有的actions;最终形成的数据:
1 2 3 4 |
store._actions = {
  'action1': [fn1, fn2], // 重名action加入到数组
  'foo/action1': [fn3] // 这个是因为有命名空间`foo`
} |
小结:通过installModule递归安装所有模块;通过makeLocalContext获取到对应模块的上下文,使得commit与dispatch能够获取到子模块的数据;根据命名空间的设定,生成带路径的调用type,分别挂载到store对应字段;并对handler的参数进行调整。
makeLocalContext
从上面可以知道,makeLocalContext是设定模块的上下文,处理过程如下:
1 2 3 4 5 6 7 8 9 10 11 12 13 14 15 16 17 18 19 20 21 22 23 24 25 26 27 28 29 30 31 32 33 34 35 36 37 38 39 40 41 42 43 |
function makeLocalContext (store, namespace, path) {
  const noNamespace = namespace === ''

  const local = {
    // 没有指定命名空间,则使用与root根路径下的调用一致
    dispatch: noNamespace ? store.dispatch : (_type, _payload, _options) => {
      const args = unifyObjectStyle(_type, _payload, _options)
      const { payload, options } = args
      let { type } = args

      // 子模块调用
      if (!options || !options.root) {
        // 拼接调用路径
        type = namespace + type
        if (process.env.NODE_ENV !== 'production' && !store._actions[type]) {
          console.error(`[vuex] unknown local action type: ${args.type}, global type: ${type}`)
          return
        }
      }

      return store.dispatch(type, payload)
    },

    commit: noNamespace ? store.commit : (_type, _payload, _options) => {
      // ...
    }
  }

  // getters and state object must be gotten lazily
  // because they will be changed by vm update
  Object.defineProperties(local, {
    getters: {
      get: noNamespace
        ? () => store.getters
        : () => makeLocalGetters(store, namespace)
    },
    state: {
      get: () => getNestedState(store.state, path)
    }
  })

  return local
} |
对dispatch的处理,如果没有指定命名空间,那么action接收到的state等是与root下一致;如果指定命名空间,则对原来调用的type进行拼接,加上对应的命名空间;对应上面所有的:store._actions的hash的key值;
对于commit的处理,与dispatch一致;而对getters和state的处理,需要对数据进行劫持,延迟更新。
至此,安装模块已经完毕,我们继续回到Store的构造函数
resetStoreVM
1 2 3 4 5 6 7 8 9 10 11 12 13 14 15 16 17 18 19 20 21 22 23 24 25 26 27 28 29 30 31 32 33 34 35 36 37 38 39 40 41 42 43 44 45 46 47 48 49 50 51 52 53 54 55 56 |
class Store {
  constructor () {
    // ...
    resetStoreVM(this, state)
  }
}

// resetStoreVm
function resetStoreVM (store, state, hot) {
  const oldVm = store._vm

  store.getters = {}
  const wrappedGetters = store._wrappedGetters
  const computed = {}
  // 对 getters 进行计算属性的处理
  forEachValue(wrappedGetters, (fn, key) => {
    computed[key] = partial(fn, store)
    Object.defineProperty(store.getters, key, {
      get: () => store._vm[key],
      enumerable: true // for local getters
    })
  })

  const silent = Vue.config.silent
  Vue.config.silent = true
  store._vm = new Vue({
    data: {
      $$state: state
    },
    computed
  })
  Vue.config.silent = silent

  // 开启严格模式,不允许不通过commit修改数据
  if (store.strict) {
    enableStrictMode(store)
  }

  if (oldVm) {
    if (hot) {
      store._withCommit(() => {
        oldVm._data.$$state = null
      })
    }
    Vue.nextTick(() => oldVm.$destroy())
  }
}

// enableStrictMode
function enableStrictMode (store) {
  store._vm.$watch(function () { return this._data.$$state }, () => {
    if (process.env.NODE_ENV !== 'production') {
      assert(store._committing, `do not mutate vuex store state outside mutation handlers.`)
    }
  }, { deep: true, sync: true })
} |
resetStoreVM主要做的是:
- 把
getters转换为store._vm的计算方法; - 在严格模式下,对
store的state数据进行深度监听;对于直接修改state数据的时候,进行错误提示。
至此,new Store()的流程基本走完,还有插件的处理,这里就暂不展开说明。
执行commit与dispatch
执行commit
上面说到,如果直接修改state的时候,会进行错误提示;那么为什么通过commit就不会呢?
1 2 3 4 5 6 7 8 9 10 11 12 13 14 15 16 17 18 19 20 21 22 23 24 25 26 |
commit (_type, _payload, _options) {
  // check object-style commit
  const {
    type,
    payload,
    options
  } = unifyObjectStyle(_type, _payload, _options)

  const mutation = { type, payload }
  // 获取调用的handler
  const entry = this._mutations[type]
  if (!entry) {
    if (process.env.NODE_ENV !== 'production') {
      console.error(`[vuex] unknown mutation type: ${type}`)
    }
    return
  }
  // 通过 _withCommit 方法调用handler
  this._withCommit(() => {
    entry.forEach(function commitIterator (handler) {
      handler(payload)
    })
  })

  // ...
} |
从上面看到,commit的流程,就是从store._mutation拿到对应的handler数组,然后逐个执行;而循环执行所有handler是包裹在_withCommit方法里面:
1 2 3 4 5 6 |
_withCommit (fn) {
  const committing = this._committing
  this._committing = true
  fn()
  this._committing = committing
} |
因为调用_withCommit的时候,会把标识位this._committing设定为true,执行中,会触发前面resetStoreVM说到的,深度监听state回调函数;该回调函数判断this._committing为true,则为正确的调用;_withCommit把函数执行完毕之后把标识位重新设定为false;这样子就可以做到,对不通过commit调用的提示。
执行 dispatch
vuex的异步操作,是放到dispatch调用:
1 2 3 4 5 6 7 8 9 10 11 12 13 14 15 16 17 18 19 20 21 22 23 24 25 26 27 |
dispatch (_type, _payload) {
  // check object-style dispatch
  const {
    type,
    payload
  } = unifyObjectStyle(_type, _payload)

  const action = { type, payload }
  const entry = this._actions[type]
  if (!entry) {
    if (process.env.NODE_ENV !== 'production') {
      console.error(`[vuex] unknown action type: ${type}`)
    }
    return
  }

  // .. try catch subscriber

  const result = entry.length > 1
    ? Promise.all(entry.map(handler => handler(payload)))
    : entry[0](payload)

  return result.then(res => {
    // ... try catch subscriber
    return res
  })
} |
从代码可以看出,通过dispatch的type找到所有的handler,如果handler只有一个,则直接返回这个handler的调用处理;若有多个,则使用Promise.all包裹处理,最终作为一个Promise形式返回;用户设定的actions实际上并不会一定是Promise,这种情况,只有一个handler会出错吗?
不会,因为handler在registerAction的时候,对返回值进行判断,若不是Promise,则直接返回Promise.resolve(res),res为actions的返回值。
除了主流程的执行,还有执行前后对subscriber执行的try...catch处理
总结
简单分析了一下vuex的源码的主要流程,发现其中很多处理都很巧妙;例如,上下文,执行参数的处理;值得学习...但是文章对插件的分析过程缺失,大家也可以去熟悉一下,END.